Welcome to my page
Chapter 3
LISTS
There are lots of occasions when we need to use lists. HTML provides us with three different types:
-
Ordered lists are lists where each item in the list is numbered. For example, the list might be a set of steps for a recipe that must be performed in order, or a legal contract where each point needs to be identified by a section number.
-
Unordered lists are lists that begin with a bullet point (rather than characters that indicate order).
-
Definition lists are made up of a set of terms along with the definitions for each of those terms.
-
Ordered Lists
- < ol >
- The ordered list is created with the < ol > element.
- < li >
- Each item in the list is placed between an opening < li > tag and a closing < /li > tag. (The listands for list item.)
-
Unordered List
- < ul >
- The unordered list is created with the < ul > element.
- < li >
- Each item in the list is placed between an opening < li > tag and a closing < /li > tag. (The listands for list item.)
- < ul >
- Definition Lists
- < dl >
-
The definition list is created with the < dl > element and usually consists of a series of terms and their definitions.
-
Inside the < dl > element you will usually see pairs of < dt > and < dd > elements.
- < dt > This is used to contain the term being defined (the definition term).
- < dd > This is used to contain the definition.
-
- < dl >
- Nested Lists
- You can put a second list inside an < li > element to create a sub-list or nested list.
SUMMARY LISTS
-
There are three types of HTML lists: ordered unordered, and definition.
-
Ordered lists use numbers.
-
Unordered lists use bullets.
-
Definition lists are used to define terminology.
-
Lists can be nested inside one another.
Chapter 13
BOXES
At the beginning of this section on CSS, you saw how CSS treats each HTML element as if it lives in its own box.
You can set several properties that affect the appearance of these boxes. In this chapter you will see how to:
- Control the dimensions of your boxes.
- Create borders around boxes.
- Set margins and padding for boxes.
- Show and hide boxes.
-
Box Dimensions
width, height
By default a box is sized just big enough to hold its contents. To set your own dimensions for a box you can use the height and width properties.
The most popular ways to specify the size of a box are to use pixels, percentages, or ems. Traditionally, pixels have been the most popular method because they allow designers to accurately control their size.
When you use percentages, the size of the box is relative to the size of the browser window or, if the box is encased within another box, it is a percentage of the size of the containing box.
When you use ems, the size of the box is based on the size of text within it. Designers have recently started to use percentages and ems more for measurements as they try to create designs that are flexible across devices which have different-sized screens.
-
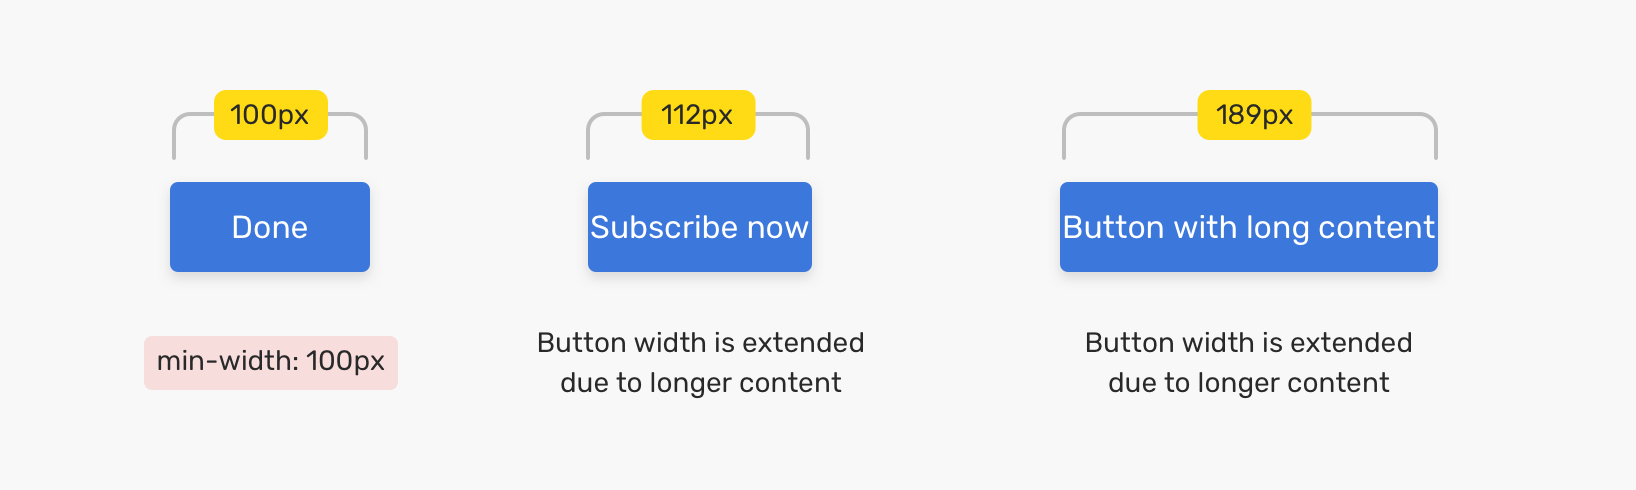
Limiting Width
min-width, max-width
Some page designs expand and shrink to fit the size of the user’s screen. In such designs, the min-width property specifies the smallest size a box can be displayed at when the browser window is narrow, and the max-width property indicates the maximum width a box can stretch to when the browser window is wide.
These are very helpful properties to ensure that the content of pages are legible (especially on the smaller screens of handheld devices). For example, you can use the max-width property to ensure that lines of text do not appear too wide within a big browser window and you can use the min-width property to make sure that they do not appear too narrow.
You may find it helpful to try this example out in your browser so that you can see what happens when you increase or decrease the size of the browser window.
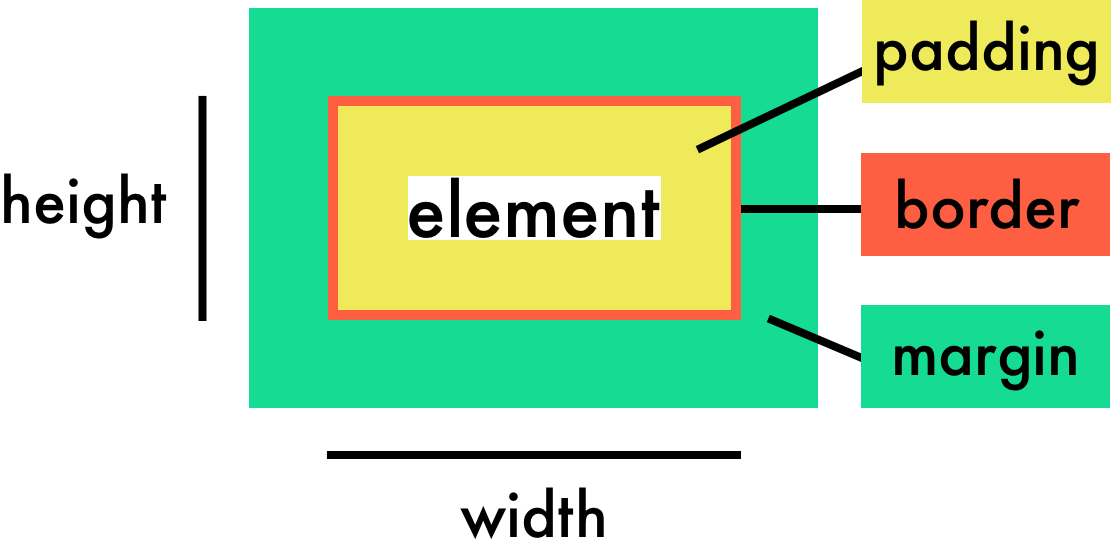
**Border, Margin & Padding **
Every box has three available properties that can be adjusted to control its appearance:
-
Border
- Every box has a border (even if it is not visible or is specified to be 0 pixels wide). The border separates the edge of one box from another.
-
Margin
- Margins sit outside the edge of the border. You can set the width of a margin to create a gap between the borders of two adjacent boxes.
-
Padding
- Padding is the space between the border of a box and any content contained within it. Adding padding can increase the readability of its contents.
If you specify a width for a box, then the borders, margin, and padding are added to its width and height.
Chapter 2
1- ARRAYS
An array is a special type of variable. It doesn’t just store one value; it stores a list of values.
-
You should consider using an array whenever you are working with a list or a set of values that are related to each other.
-
Arrays are especially helpful when you do not know how many items a list will contain because, when you create the array, you do not need to specify how many values it will hold.
-
If you don’t know how many items a list will contain, rather than creating enough variables for a long list (when you might only use a small percentage of them), using an array is considered a better solution.
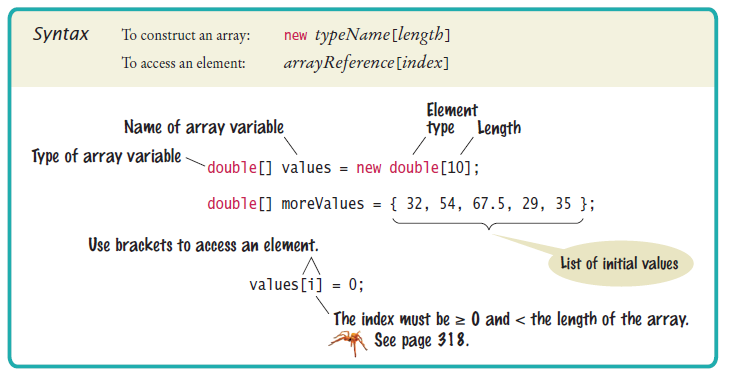
2- CREATING AN ARRAY
You create an array and give it a name just like you would any other variable (using the var keyword followed by the name of the array).
The values are assigned to the array inside a pair of square brackets, and each value is separated by a comma. The values in the array do not need to be the same data type, so you can store a string, a number and a Boolean all in the same array.
This technique for creating an array is known as an array literal. It is usually the preferred method for creating an array. You can also write each value on a separate line:
colors= [
‘white’ ,
‘black’ ,
‘custom’
];
3- VALU ES IN ARRAYS
Values in an array are accessed as if they are in a numbered list. It is important to know that the numbering of this list starts at zero (not one).
-
NUMBERING ITEMS IN AN ARRAY
- Each item in an array is automatically given a number called an index. This can be used to access specific items in the array.
- ACCESSING ITEMS IN AN ARRAY
- To retrieve the third item on the list, the array name is specified along with the index number in square brackets.
- NUMBER OF ITEMS IN AN ARRAY
- Each array has a property called length, which holds the number of items in the array.
Chapter 4
Decisions and Loops

SWITCH STATEMENTS
A switch statement starts with a variable called the switch value. Each case indicates a possible value for this variable and the code that should run if the variable matches that value.
Here, the variable named option is the switch value. If the value of the option variable is the string A, then the code for the first case is executed. If it is B, the second case is executed. If it is C, the third case is executed. If it is none of these, the code for the defaul t case is executed.
The entire statement lives in one code block (set of curly braces), and a colon separates the option from the statements that are to be run if the case matches the switch value.
At the end of each case is the break keyword. It tells the JavaScript interpreter that it has finished with this switch statement and to proceed to run any subsequent code that appears after it.
IF … ELSE
-
There is no need to provide an else option. (You can just use an if statement.)
-
With a series of if statements, they are all checked even if a match has been found (so it performs more slowly than switch).
VS.
SWITCH
-
You have a default option that is run if none of the cases match.
-
If a match is found, that code is run; then the break statement stops the rest of the switch statement running (providing better performance than multiple if statements).
- LOOPS
Loops check a condition.It is returns true, a code block will run. Then the condition will be checked again and if it still returns true, the code block will run again. It repeats until the condition returns false. There are three common types of loops:
-
FOR
- If you need to run code a specific number of times, use for loop. (It is the most common loop.) In a for loop, the condition is usually a counter which is used to tell how many times the loop should run.
- WHILE
- If you do not know how many times the code should run, you can use a while loop. Here the conditioin can be something other than a counter, and the code will continue to loop for as long as the condition is true.
- DO WHILE
- The do .. while loop is very similar to the while loop, nut has one key difference: it will always run the statements inside the curly braces at least once, even if the condition evaluates to fales.
For more info about Decisions and Loops please visit : Link
© 2021