Welcome to my page :)
Chapter 5
IMAGES
There are many reasons why you might want to add an image to a web page: you might want to include a logo, photograph, illustration, diagram, or chart.
There are several things to consider when selecting and preparing images for your site, but taking time to get them right will make it look more attractive and professional.
In this chapter you will learn how to:
- Include an image in your web pages using HTML.
- Pick which image format to use.
- Show an image at the right size.
- Optimize an image for use on the web to make pages load faster.
Choosing Images for Your Site
A picture can say a thousand words, and great images help make thedifference between an average-looking site and a really engaging one.
Images can be used to set the tone for a site in less time than it takes to read a description. If you do not have photographs to use on your website, there are companies who sell stock images; these are images you pay to use (there is a list of stock photography websites below). Remember that all images are subject to copyright, and you can get in trouble for simply taking photographs from another website.
If you have a page that shows several images (such as product photographs or members of a team) then putting them on a simple, consistent background helps them look better as a group.
Images should…
- Be relevant
- Convey information
- Convey the right mood
- Be instantly recognisable
- Fit the color palette
Stock photos
Online extra
We have provided an online gallery that helps you choose the right image for your website. You can find it in the tools section of the site accompanying this book.
Storing Images on Your Site
If you are building a site from scratch, it is good practice to create a folder for all of the images the site uses.
-
As a website grows, keeping images in a separate folder helps you understand how the site is organized.
-
On a big site you might like to add subfolders inside the images folder. For example, images such as logos and buttons might sit in a folder called interface, product photographs might sit in a page called products, and images related to news might live in a folder called news.
-
If you are using a content management system or blogging platform, there are usually tools built into the admin site that allow you to upload images, and the program will probably already have a separate folder for image files and any other uploads.
Adding Images
< i mg src=”images/quokka.jpg” alt=”A family of quokka” title=”The quokka is an Australian marsupial that is similar in size to the domestic cat.” / >
< img >
To add an image into the page you need to use an < img > element. This is an empty element (which means there is no closing tag). It must carry the following two attributes:
src
This tells the browser where it can find the image file. This will usually be a relative URL pointing to an image on your own site. Here you can see that the images are in a child folder called images
alt
This provides a text description of the image which describes the image if you cannot see it.
title
You can also use the titleattribute with the < img > element to provide additional information about the image. Most browsers will display the content of this attribute in a tootip when the user hovers over the image.
Height & Width of Images
< img src=”images/quokka.jpg” alt=”A family of quokka” width=”600” height=”450” / >
You will also often see an < img > element use two other attributes that specify its size:
height This specifies the height of the image in pixels.
width This specifies the width of the image in pixels.
Images often take longer to load than the HTML code that makes up the rest of the page. It is, therefore, a good idea to specify the size of the image so that the browser can render the rest of the text on the page while leaving the right amount of space for the image that is still loading.
Where to Place Images in Your Code
Where an image is placed in the code will affect how it is displayed. Here are three examples of image placement that produce different results:
1. before a paragraph
The paragraph starts on a new line after the image.
2. inside the start of a paragraph
The first row of text aligns with the bottom of the image.
3. in the middle of a paragraph
The image is placed between the words of the paragraph that it appears in.
Where you place the image in the code is important because browsers show HTML elements in one of two ways:
-
Block elements always appear on a new line. Examples of block elements include the < h1 > and < p > elements.
-
Inline elements sit within a block level element and do not start on a new line. Examples of inline elements include the < b >, < em >, and < img > elements.
Capter 11
Color
Color can really bring your pages to life.
In this chapter we will look at:-
-
How to specify colors, as there are three common ways in which you can indicate your choice of colors (plus extra ways made available in CSS3).
-
Color terminology, as there are some terms that are very helpful to understand when it comes to picking colors.
-
Contrast, and ensuring that your text is readable.
-
Background colors for behind either your entire page or parts of a page.
Foreground Color
color
The color property allows you to specify the color of text inside an element. You can specify any color in CSS in one of three ways:
-
RGB VALUES
-
HEX CODES
-
COLOR NAMES
1. RGB VALUES
These express colors in terms of how much red, green and blue are used to make it up. For example: rgb(100,100,90)
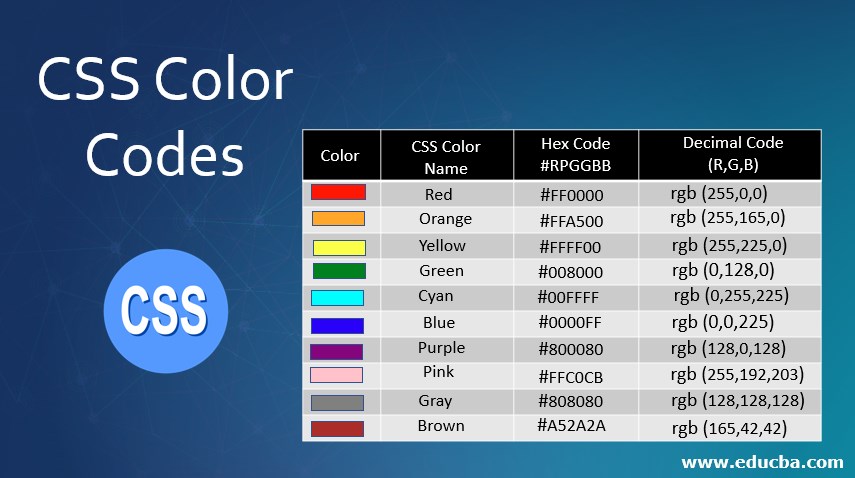
2. HEX CODES
These are six-digit codes that represent the amount of red, green and blue in a color, preceded by a pound or hash # sign. For example: #ee3e80.
3. COLOR NAMES
There are 147 predefined color names that are recognized by browsers. For example: DarkCyan.
Capter 12
TEXT
The properties that allow you to control the appearance of text can be split into two groups:
-
Those that directly affect the font and its appearance (including the typeface, whether it is regular, bold or italic and the size of the text).
-
Those that would have the same effect on text no matter what font you were using (including the color of text and the spacing between words and letters).
The formatting of your text can have a significant effect on how readable your pages are. As we look through these properties I will also give you some design tips on how to display your type.


Typeface Terminology
-
Serif
-
Serif fonts have extra details on the ends of the main strokes of the letters. These details are known as serifs.
- In print, serif fonts were traditionally used for long passages of text because they were considered easier to read.
-
-
Sans-Serif
-
Sans-serif fonts have straight ends to letters, and therefore have a much cleaner design.
- Screens have a lower resolution than print. So, if the text is small, sans-serif fonts can be clearer to read.
-
-
Monospace
-
Every letter in a monospace (or fixed-width) font is the same width. (Non-monospace fonts have different widths.)
- Monospace fonts are commonly used for code because they align nicely, making the text easier to follow.
-

-
WEIGHT
- Light
- Medium
- Blod
- Black
The font weight not only adds emphasis but can also affect the amount of white space and contrast on a page.
-
STYLE
- Normal
- Italic
- Oblique
Italic fonts have a cursive aspect to some of the lettering. Oblique font styles take the normal style and put it on an angle.
-
STRETCH
- Condensed
- Regular
- Extended
In condensed (or narrow) versions of the font, letters are thinner and closer together. In expanded versions they are thicker and further apart.
© 2021.